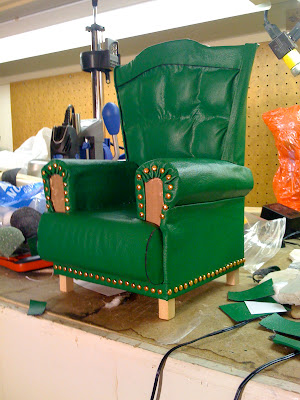
Chris's chair is almost finished now!
If you were to ask me what I liked better, sculpting or upholstering, you know what I would say? ...Probably nothing, because I would still be out in the workshop upholstering THIS CHAIR. In other words, UPHOLSTERY IS A MAJOR PAIN IN THE NECK! .... that being said, it's finally almost finished now :-)
By the end of last week's post, the chair looked like this:

After having a slight character modification, it turns out the back of the chair is going to be way taller than it needs to be. This calls for some major changes to the chair...
Now when something like this happens, it is easy to get frustrated. But it is also easy to realize that, in these instances, backtracking is actually moving forward and making progress.

Here I carefully cut and peeled away quite a bit of stuffing. After measuring and marking exactly where the new back should be, I very delicately cut the back with a small hand saw. Here is the new back height:

To make the arms rounded, I carved them out of styrofoam with my handy-dandy styrofoam cutter. If you like using the wire styrofoam cutters, more power to you - I cannot stand those things!


There is a special type of styrofoam glue I like to use. Lots of glues (and almost anything in an aerosol can) will melt styrofoam. I have read from our buddies Justin and Shel (they post comments as "Jriggity") that liquid nails works pretty well too. Here is the stuff I used:

It works unbelievably well sticking styrofoam to styrofoam, but it really doesn't work that well on anything else.

And now comes the fun part.... the upholstering!! I couldn't tell you how many glue sticks I went through attaching all this fabric, but the burns on my fingers can attest to the fact that I was using the glue gun like a madman on this thing. I love the character on these arms! I can see the wood needs to have quite a darker stain though...

What you can't see on the following picture is that both sides of the chair are actually one piece of fabric, connected by the small strip at the bottom on the front of the chair. I had to make it all one piece or the seam would seem out of place. Not easy, let me tell you!

I used a product called "Nufoam" to shape the front mattress. You can cut it easily with a big pair of scissors.

Wrapping up the foam...

After experimenting with a few things, I decided to go with a sharp edge for the side of the mattress. It will look a little funny until the trim pieces are added, but once they are it is really going to 'pop'.


Over the past few weeks, I have been keeping my eyes peeled for some gold studs everytime I walked through an arts store. Well, the other day I came across the perfect find! These studs were on clearance for a couple bucks and are supposed to fit with some little girl's clothing stud machine. Don't ask me.... but they are the pefect size.

Only problem: they look brand new. This chair is going to be very aged by the end of this process, and bright shiny gold studding would look very out-of-place.

So I painted them, one at a time, with a rusty metalic paint. Then I went back over and scratched them with a razor blade so a little bit of the original gold would show through. My cell phone camera is always out of focus, but you can get an idea of the difference from this shot:

And after adding the studs.....


And that's all for Part Two! It might not have seemed like much of a difference, but it was a lot of work!! Stay tuned for Part Three. There still needs to be a thick trim around the seams and the feet need to be sculpted. Then the entire thing needs to be aged. Here is a sample pic of what the trim will look like (this was edited in Microsoft Paint):

-Duane


Awsome chair! :P
ReplyDeleteI love how much effort you put into the details, i just make things in hope they won't be seen..
hehe :D