Thursday, March 11, 2010

Props to my prop-makers!


Hello everyone! We're still moving onwards and upwards. Man, this whole "create an entire world and animate it one frame at a time" is extremely fun! I become overly ecstatic whenever I see something new that the guys are working on even if it's a small, seemingly insignificant object that will probably only get about 0.5 seconds of actual screen time. It doesn't matter, they put their all into it! The level of talent and detail that these guys have is just amazing so I dedicate this blog post to everyone working on the props for the film and will show you all a few of the props these guys have hammered out.
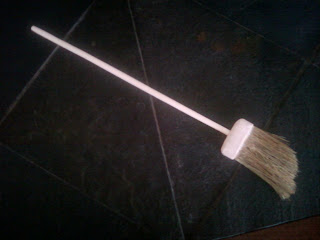


The first here is the broom. The broom is a prop that plays a significant role in the film so it had to be detailed. What I like about this prop is the fact that the creator (Steve) took the time to actually modify a real brush as opposed to creating the entire thing in clay. My personal taste as a director agrees with the use of realism even in an animated medium. Great job, Steve!
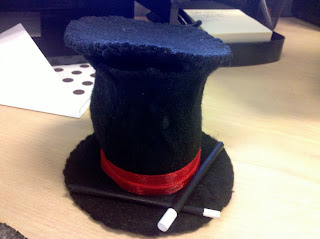

This magician's hat and variations of magic wands were created by Jared. What I love about this prop is that it captures a rustic, cartoonish spirit but still remains grounded in reality (if that makes sense). It has life in it and hopefully that comes across in my poorly taken camera phone photo.
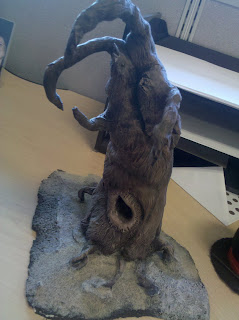


Love, love, LOVE this piece. It is technically considered a prop piece which falls under Brian's jurisdiction but I don't care! I love it! The picture doesn't do it justice as I only took a picture of one side of the tree. But what I love about it is the very clear and distinct immediate mood or feeling you retrieve from it. That's hard to pull off effectively! Props to Brian!
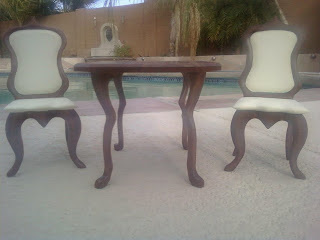


Wait... How big are those chairs and table? That's right, these props are at a 2" = 1' scale. Look at the detail! Look at the structure, design and architecture of these pieces! Amazing work! Steve has proved his talent once again! Below I've added just a quick photoshop I've created to give you a further look as to how the piece would end up as these props are technically still in the process of being made.
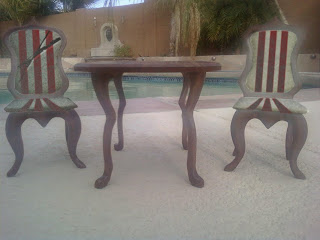

These guys are really adding an amazing value to this film. As a director, I cannot wait to see this film in it's completion and share their talent with everyone else. We are starting production soon and we are looking into ways to provide you all with a more intimate involvement with the creation of this film so stay tuned Moving Day watchers!

Read more!

Sunday, January 10, 2010

Director's Journal #5


Duane our resident Animator kicks off the new year with a HARRUIKAN!


Howdy folks and happy New Year! The beat goes on and I guess that means so do we. Our latest production meeting, I took the liberty to snapping some pics on the progress and excited to show them off here on the blog. The set is right on the brink of being done and it's already looking great! Our main character Chris is taking shape and gaining personality. We will be revealing him soon!

Our meeting this last weekend was generally to set up and lay out the very first shots of animation and make sure we were all on the same page. Coming from experience in live-action, it's interesting to see the differences that stop-motion has to offer. For example, no need for a boom mic! Below are some of the images I was able to take at the meeting. A lot more is coming soon as we begin actual production of "Moving Day!"


Mr. Wohlers pops up from the trap door to work on the set. Yes, each and every floorboard (tongue depressors) had to be glued down and wood stained


The trap door is the last to be laid with floorboards. The staircase that you see here is drywall with cut out steps. Mr. Wohlers will fill everyone in on a special post on the construction of each of the elements in the set.


This is a general layout shot of the inside of the house. We just wanted to set up some framing and spacing options. The fireplace in the background will be created by Steve who just uses some dry wall as a visual. An entire post could be dedicated on the fireplace alone. We're talking green screen, separate LED's and a very customized design!

Matter of fact, here is some of the concept art for the design and construction. Inside the actual firebox are going to be placed a strip of LED's to light the green screen in the back. It's important to isolate a light source just for the green screen. What's interesting about this is that the green screen itself will only be inches and the light source itself will have to be tiny. THANK YOU modern technology LED's!


Here we see the semi-winding staircase that leads from the top of the stairs.


Again lining up and mapping out our shots. Nick (Producer) and Duane (Animator)


Where the magic happens! A peek into the character creation.


Dad? Just some concept art of Chris' dad. He may be on the site but not in the actual animation. More to come on that!


Read more!

Thursday, July 16, 2009

The Foundations of a Great Animation pt. 2

Thank you for checking back, in this post I will finish talking about making a great animation table and let you see some pics of ours.


In the last post I talked about the weight of the table, I feel this is the most important aspect. And if weight is the most important it is only by a little because the second most important is accessibility. The perfect weight will not mean much if the animator can not access it properly. Make sure there is enough room underneath and there is a way to get there. This brings up an important note, if you are building a big table like we are, you must take into the account of the weight of the set and support the middle properly. This will vary from table to table, I personally prefer to make the board that will go into the table as rigid as possible and prefer less on another extra support that will no doubt get in the way of the animator.

At this point I should point out that this information is for freestanding animation tables, not small scenes that rest on counter tops. That is for another post entirely.

Now when you are done so far, you should have a box frame with no table top that does not move very far and has a way for the animator to get underneath the table top with it is in place. Next comes the table top and there are two main ways to go about it.

If you only need the table for one set, then just screw, bolt, nail, glue, or bubble gum the boards on top directly to the box frame, you should be fine. But I like to be a versatile as possible, so I like hollow tables where you can set different sets on/or in them. The only major problem this represents is that you need more than one scene that can use the size of table you're building. This is where planning very crucial. If you are planning to have multiple sets in one table, simply install wooden braces on the inside of the box frame, 1/4in. from the top along the entire interior. once again, watch those supports for the center!

Well, those are the major brush strokes of how to build a table. They can be made out of almost any wood, here as you can see we reused free pallets and lumber. Besides the added benefit of being free, using scrap wood is that much harder. If you can build one with scrap wood, you can build anything.

Here is our table almost complete. This will be the main access point for our animator.


Here are a couple views of the dry run with the first table top that will be going in. The sides have not been cut down to size yet, but this gives an idea of what it will be like. Also, if you look carefully at the back of the table, there is a chair. Could this be the one going to be used in the film? Who is John Galt?
Read more!

Wednesday, July 8, 2009

The Foundations of a Great Animation

Today I will go over some points and tips on how to build a great animation. In animation you will need a table from which to animate. Sounds pretty simple right?

Animation tables come in all different sizes, shapes, and with different functions. There are some attributes that are generally common to all tables. Usually, you will start out with a idea or drawing similar to the blueprint above. Always draw your plan out ahead of time! I can't stress that enough. Unless you are a master carpenter with a steel trap for memory, always sketch it out. If you have a animator, now is a good time to get with them and go over the details. You will need to take into account how the animator is going to use it, need access to the underside, etc. If you are the animator and set designer, think ahead about these same things. The last thing you want is to put a support beam right where your animator (or you) need to get to.

It needs to be heavy. Now you may ask, how heavy? That's a great question, thanks for asking. It needs to be light enough for you to move if necessary, but heavy enough to where a casual bump won't budge it. If you ever run into an animator, ask them if they have ever bumped a set that was too light. Most of the time you will hear a war story about how hours of work were lost because of this.

Tomorrow I will have more plus photos of our set being constructed. Till then!
Read more!

Saturday, June 27, 2009

People mover!

Our resident machinist Scott Petrie (my dad) has just finished one of the coolest production pieces yet for Moving Day.
Introducing the "People Mover"!


If you've been following this blog for any length of time, you have probably heard me reiterate again and again the importance for having complete control over your character's movements. This typically means always having your character bolted to the ground to prevent any unintended movements.

"Ok," you might say. "That makes sense." But the first thing everyone wonders when they sit and think about animation for any period of time is, "Well wait a minute, what about when someone jumps in the air? How do you bolt them to thin air??"

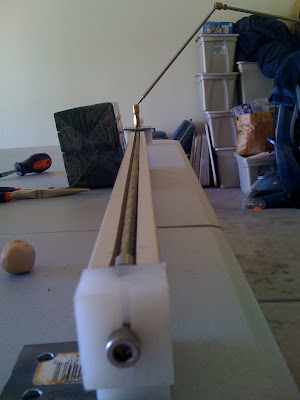
Hmm, good question! Back in ye olde days of stop motion animation, characters were suspended in mid-air with very tiny fishing line. This is still used today in some animations, but most of the time the character is held up by something that is later photoshopped out. Often times this is called a "flying rig." We have called ours the People Mover and somehow the name just stuck:


Look ma, no ground contact!

This partially-finished armature was constructed with 1/4"-20 nuts in his upper back, lower back, and bottom of his butt. I can attach him to the People Mover in any of these locations and have him held 100% securely in place! Later on, after the animation is filmed, we will go back and edit out the bar so it looks like he is suspended in mid-air.

The ingenious design of this rig is of the first to come out of our armature / rigging machine shop run by none other than my father Scott Petrie. There was another famous team of father-son stop motion animators that made a pretty big impression on quite a few people... ever heard of a little guy by the name of Ray Harryhausen? If you don't think you have... you have, you just don't know it yet. Google it up.

Ray's dad was an accomplished machinist and designed a lot (if not all) of his armatures which Ray later animated and inspired nearly every special effects guru of our day. In the same way, my dad is currently building - well, that's a different story :-)

For now, take a look at these pictures of our awesome People Mover:

You can turn the crank for very precise movements along this plane:


This one is nice and long. Others may be shorter if the space is limited.


Notice the ball and socket joints. The sockets are designed to be the exact radius of the ball, providing maximum coverage for the most resistance with the smoothest movement. In other words, they aren't going to wear out for a long time and they will hold their tension very well.


There is a different type of joint for where the armature attaches to the arm, which makes it a breeze to attach this to a character.


Well, back to the shop to keep production rolling! It's a big set-design construction day over here. More to come soon.

-Duane

Read more!

Thursday, June 25, 2009

Set design update

I was going to post a tutorial here, but due to technical difficulties (my camera ran out of juice) I would have to pull pictures from the Internet. I like my money and don't like getting sued so I decided against that.

Whew! Things have been very busy lately. Chairs are getting finished, props are being built, big plans are in the mix, etc. Unfortunately due to some technical difficulties pictures are not currently available. But fear not! Next week we should have an update on the set posted here. Read more!

Monday, June 22, 2009

Have a Seat, part three


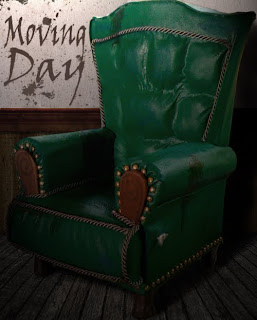
The chair is finished!


You are going to have to forgive me for being a little sparse on details... First I was out of town for almost a week and then I was sick for even longer - so this post is a long time coming! I didn't take a lot of production pics because I just wanted to get it finished ASAP.


For those of you who enjoyed all the details, here is a quick rundown of what has happened since the last post.
  • Used epoxy putty on the feet to sculpt the shape and also affix a bolt to the bottom of the feet for attaching the chair securely to the set (see pic below)
  • Used "Goop" to glue the threading all over the chair. Yea, that's real threading from a fabric store.
  • Cut out balsa wood panels for the front of the arms. Stained them with walnut-covered wood stain.
  • Painted the feet with the same wood stain.
After that, the chair was finished!


And here is where the story gets a little sad, well for me anyway. This chair is supposed to look old and beat-up. Only problem is, it looks brand new. So, after having just made the chair perfect and beautiful, I went to town making it look "old" with the help of my sanding dremel and wood stain.
What do you think?


-Duane


Read more!